DISCLAIMER: This tutorial was written for those who are already familiar with the AtoZ Connect email feature. If you are looking for a basic introduction, please take a look at our knowledge base.
Creating a professional looking email doesn't have to be hard. Learn how to get a better response from your parents by using a few simple tools.
You may be thinking “I don’t even know where to begin in creating a fancy email!” Don’t worry – I’m going to go over a few of my favorite FREE tools that will give you the ability to craft professional looking email with a few clicks.
We will be using these tools to design our email, then will export the HTML template, copy and then paste it into AtoZ Connect.
FREE Tools:
- Mail Chimp – Simple Drag and Drop email builder
Overview
The email editor in AtoZ Connect is fairly basic. If you know a bit of HTML and CSS, you can pretty much make any design imaginable – but most users don’t know what HTML and CSS even are. That’s OK – as in this tutorial Mailchimp will be handling all of the hard stuff for us. All we will have to do is Export the template created in MailChimp and paste it into the AtoZ Connect compose email screen. Sounds simple right? Let’s get started!
Selecting a layout
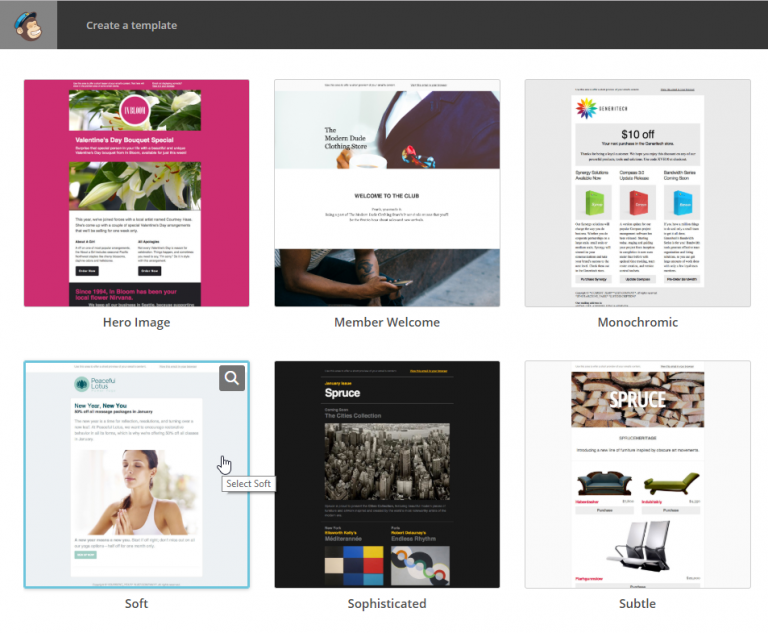
Once you have your Mail Chimp account setup, the next step is to select a Layout. Mail Chimp offers a good variety of starter templates, so pick one that you like and let’s get started! I would suggest choosing a layout that is fairly generic so that you can use if for all of your emails.
Creating the Email
For this example, I will be using the “soft” email layout. I chose this because it is simple and easy to work with. I will be creating a simple “newsletter” for parents of my sample school, letting them know our new Spirit wear is available!
What to add to my email?
1. Upload a logo – Let parents know its official by uploading your school logo to the header.
2. Short, Sweet and to the point – Don’t overload the reader with a TON of words. Create short, sweet and to the point content that doesn’t put your readers to sleep.
3. Include images – visuals are a great way to reduce wording. As the saying goes. “A picture is worth a thousand words”
4. Call to Action Button – if you want your parents to purchase a product, include a button for them to click! Make sure you test the buttons you add so you’re not frustrating your parents with broken links.
5. Think about mobile – over 60% of email is now read from our phones. Make sure that as you write and test these emails accordingly.
Review and spell check
You can’t “un-send” an email – so best to make sure its correct, before you hit the almighty “SEND” button.
I added some copy, and a few images to my email below. I’m pretty happy with it, so i’m going to now clean up a few things.

Pretty simple, right? I have a header, a short bit of copy, an image and a call to action button allowing parents to go right into my store.
Getting template ready to export.
Since we will be exporting this email template from Mailchimp, there are a few things we should do first.
1. Remove header – Mail Chimp inserts a “view this email in your browser” block at the top of your emails. We want to remove this by clicking the “trashcan” icon when hovering this block.
2. Remove footer – AtoZ Connect provides useful footers already so we can just click the Trashcan icon next to the footer to remove that block.
Save and Export.
Once you’re ready – time to Save your template.
In the bottom right of Mail Chimp, click the “Save and Exit” button. Give your layout a name and click “Save”
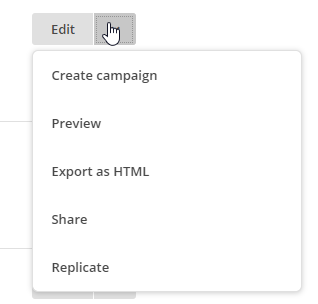
Next to the template you just saved, click the drop-down box and click “Export as HTML”.
Import into AtoZ Connect
After the export, you are left with a .html file. In order to import this into AtoZ Connect. We first need to open this file to view the HTML.
WINDOWS: right click on this file and click “open in notepad”
MAC: open with Text Edit
Once you have opened this file, you’ll see a bunch of random text. Select all, then copy this text to your clipboard.
Open atozconnect.com and compose a new email.
On step 2 (Compose) you can click the “Source” button then, paste the HTML that you just copied to your clipboard into this box. Click the “Source” button once more after you have pasted the text.
You should now see a preview of your email in the body field like in the example below.
That's it!
Take a moment to send yourself a test email. View it from your desktop, mobile device and send to a few others if needed to get their opinion.
Feel free to make any small edits to the wording inside AtoZ Connect – just avoid doing anything too fancy as you may break the template causing some weird behavior.
FAQ's
What is *|MC_PREVIEW_TEXT|* ?
If you are seeing this when sending emails – open the source tab again and do a CTRL + F. This will allow you to search for text in the source. paste *|MC_PREVIEW_TEXT|* and click enter. Once the result is found – just delete that line all together from the source.